Technology & AI

  • Checkerboard Karel Solution

    Checkerboard Karel Solution

    Stanford offers this really cool free learning platform called Code in Place. I’m currently enrolled in the 2024 class and have finished my week 2.

    There is this Optional problem called Checkerboard Karel, and this is my solution to it. I’m sure there are other ways to solve the problem, and feel free to let me know by commenting down below, or connect with me on Twitter/X.

    The Problem

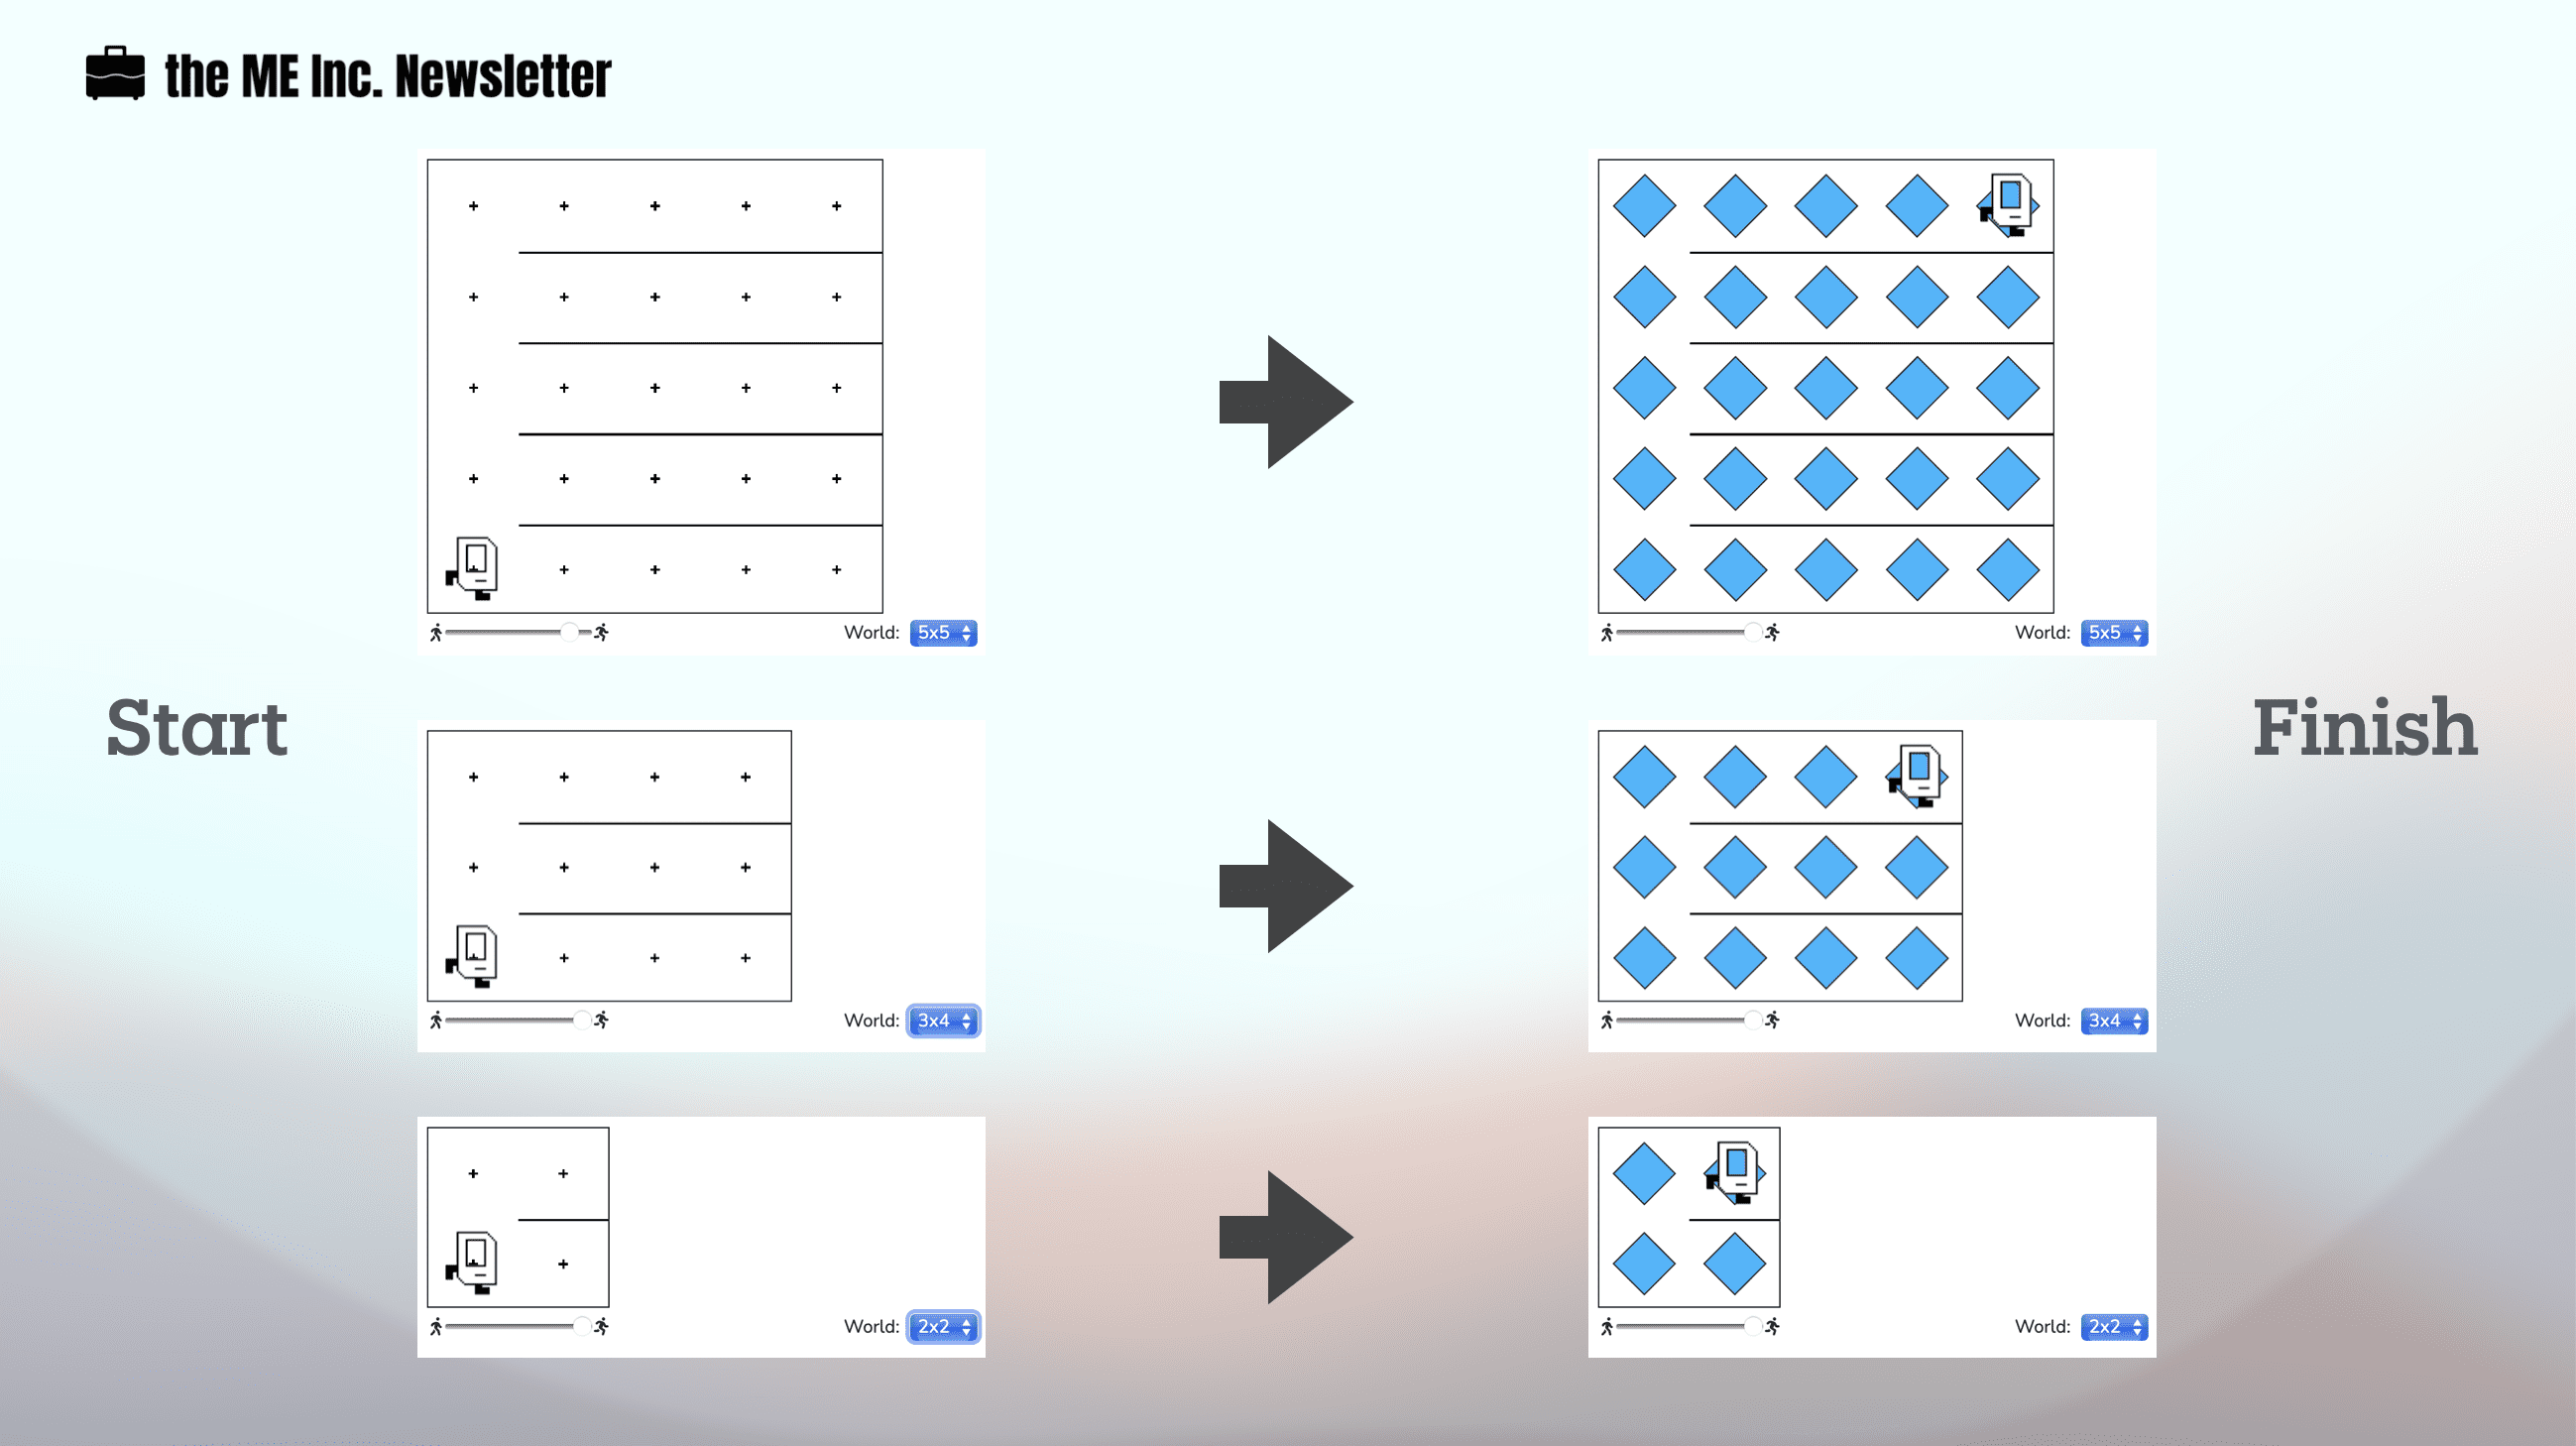
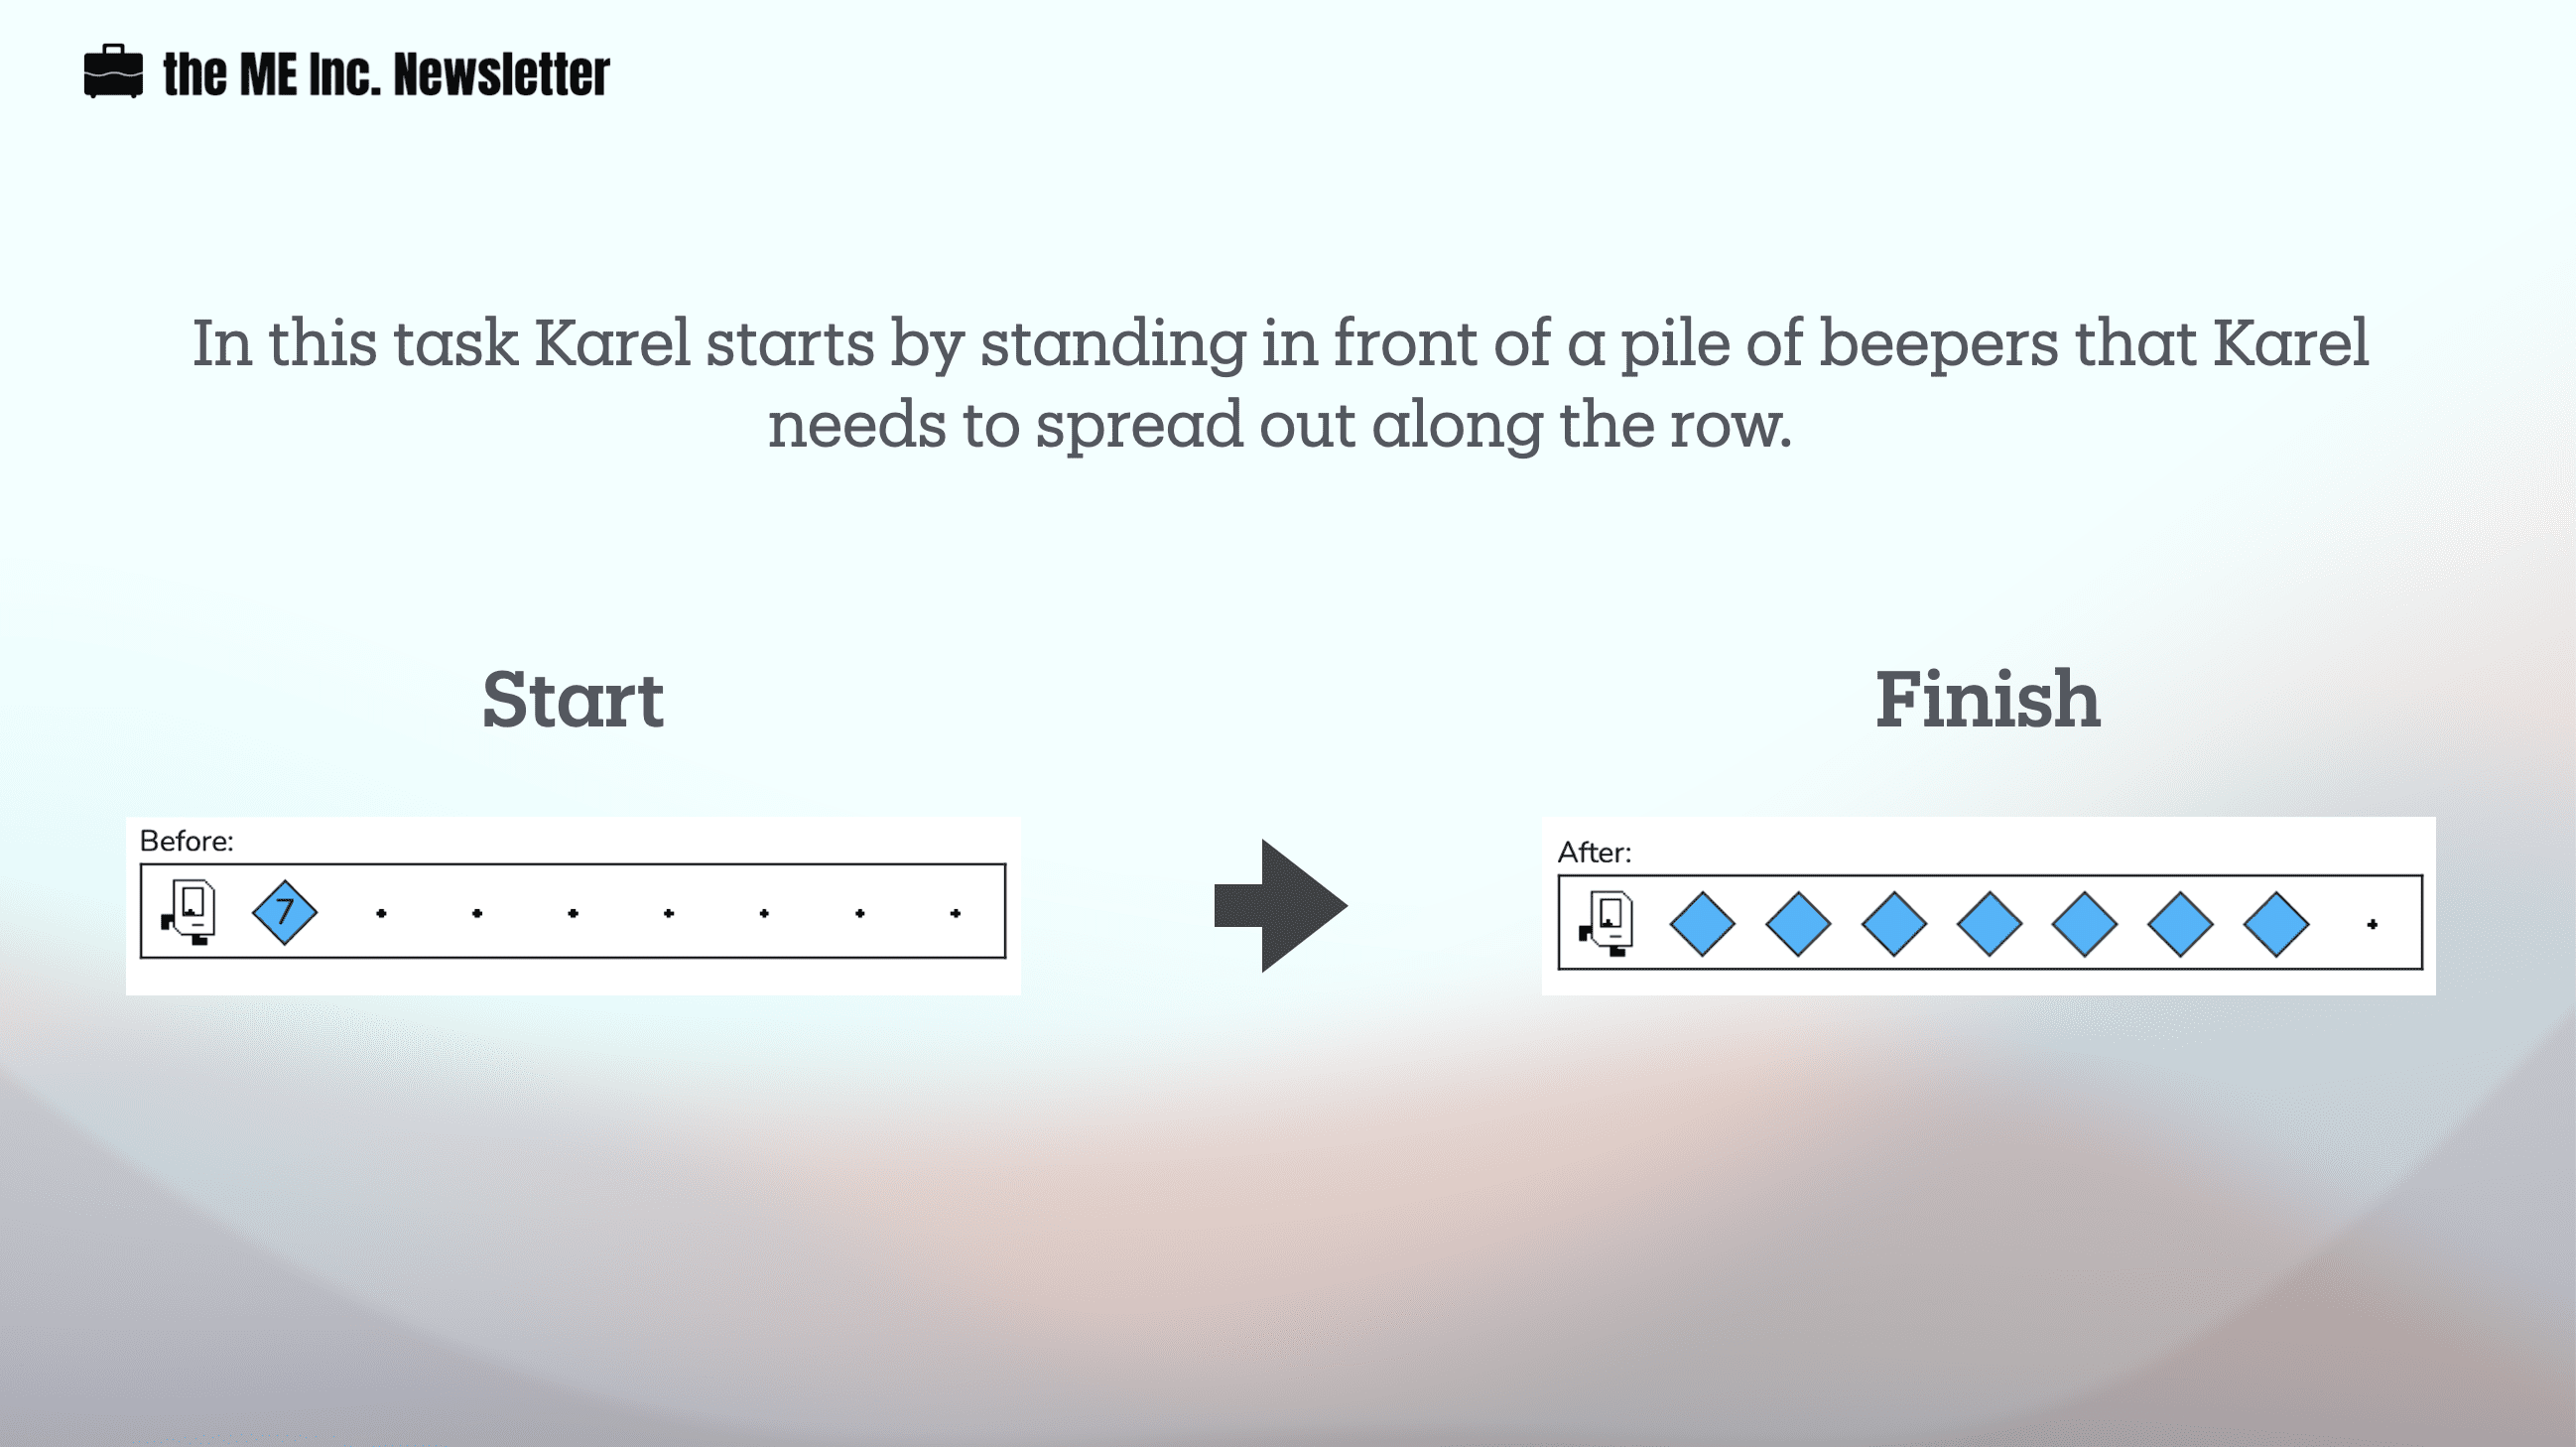
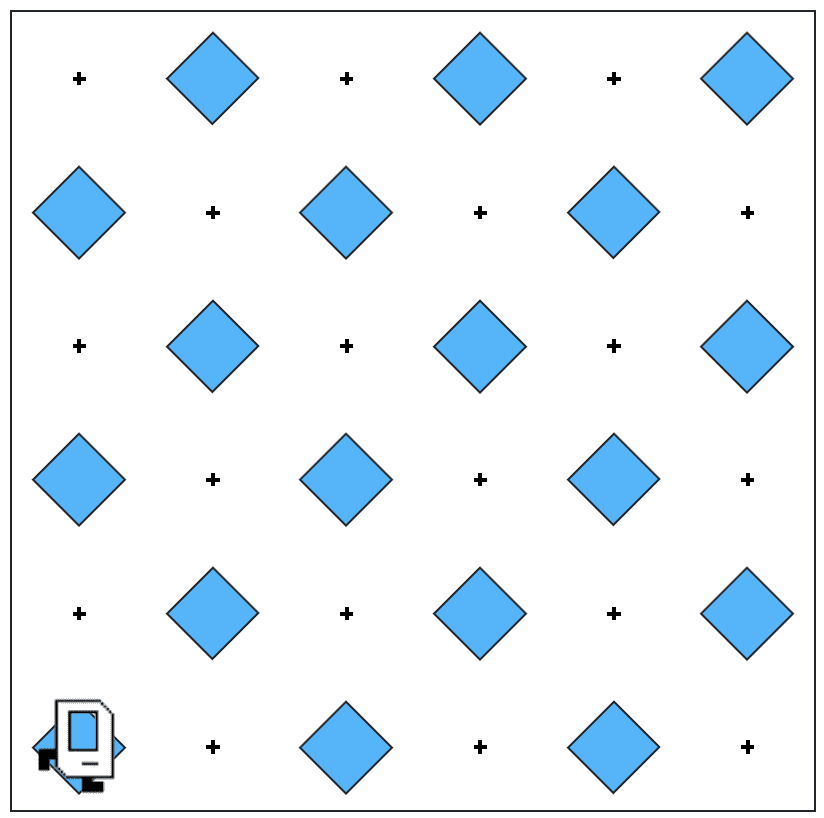
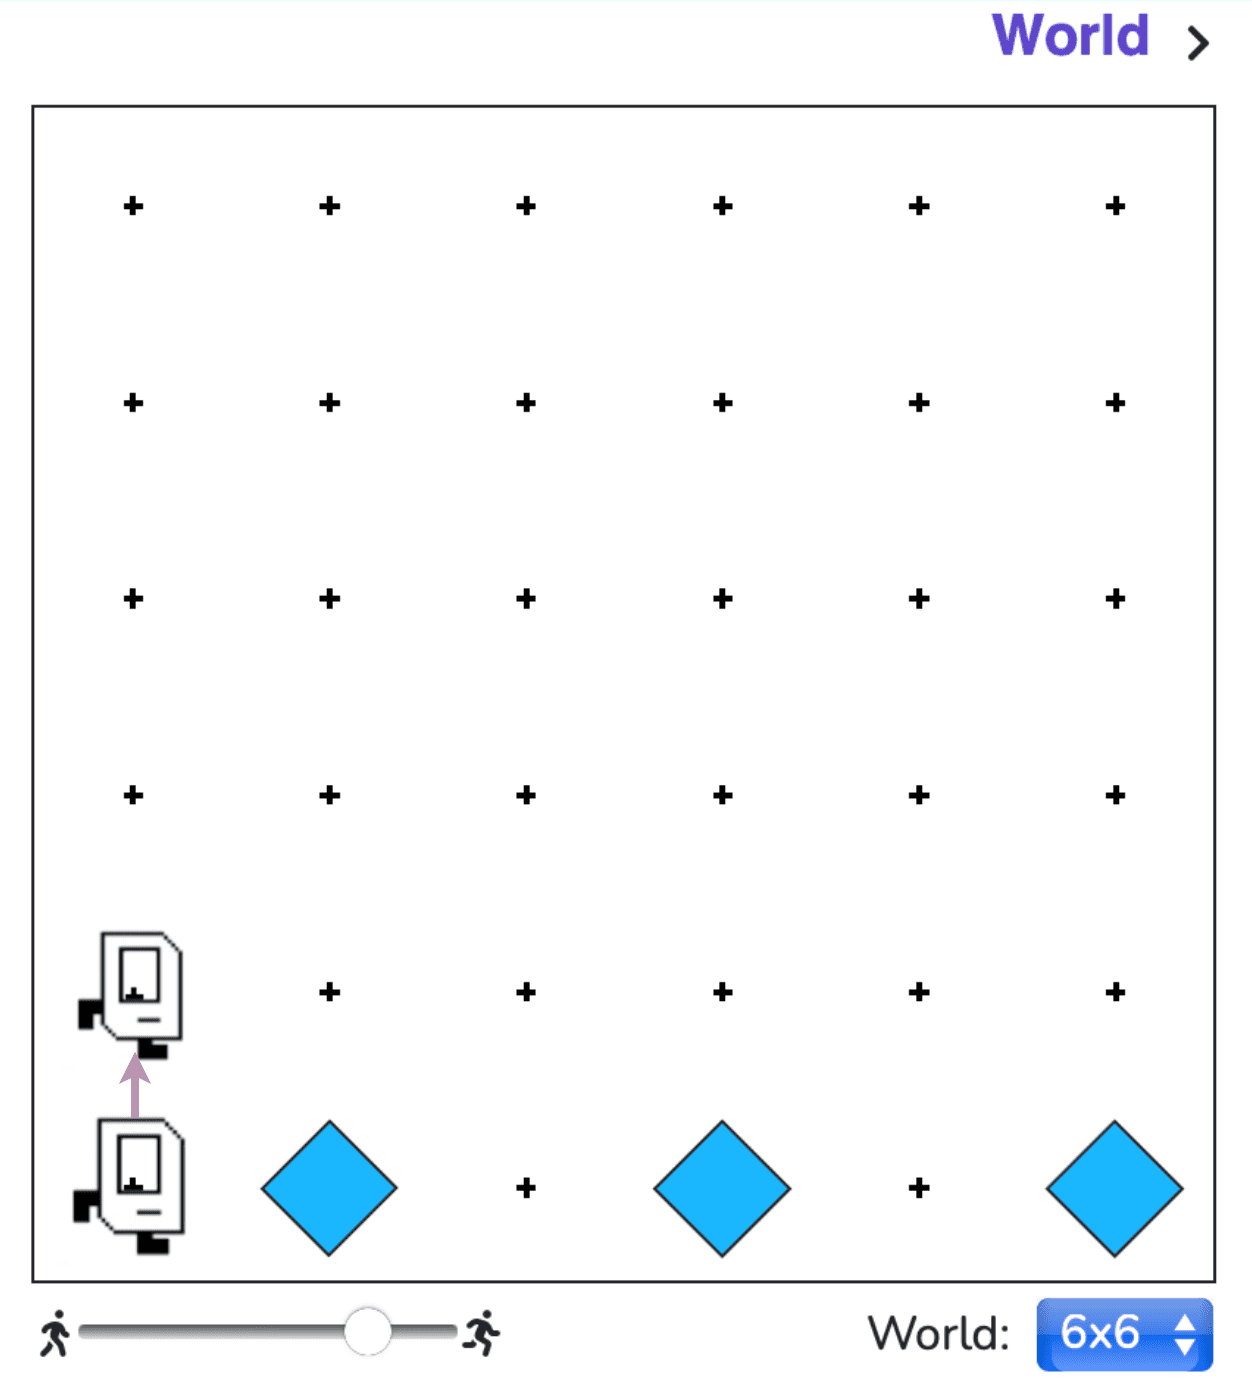
    This problem asks us to get Karel to create a checkerboard pattern of beepers from an empty world to a world like this:

    Karel starts and finishes from the same position. We don’t really know how big the world is, or whether there are odd or even numbers of columns or rows, which means that Karel could be working in a world like this:
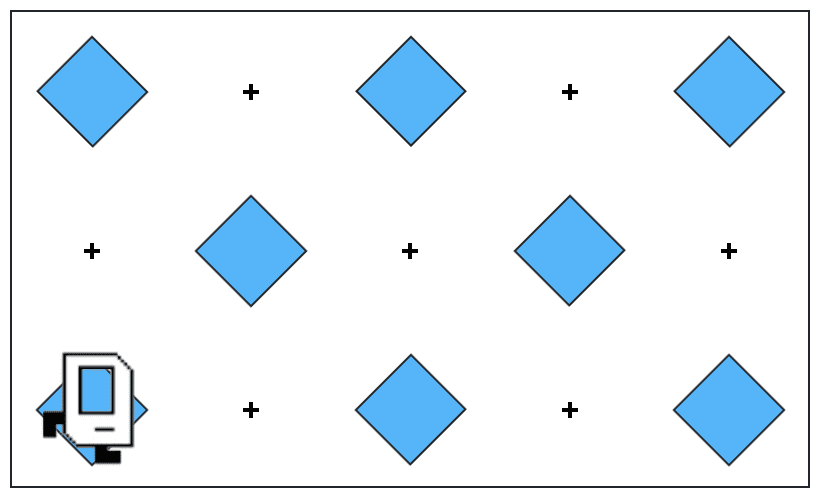
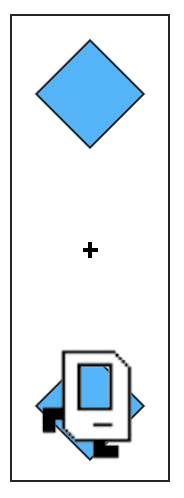
    Or this:

    The algorithm

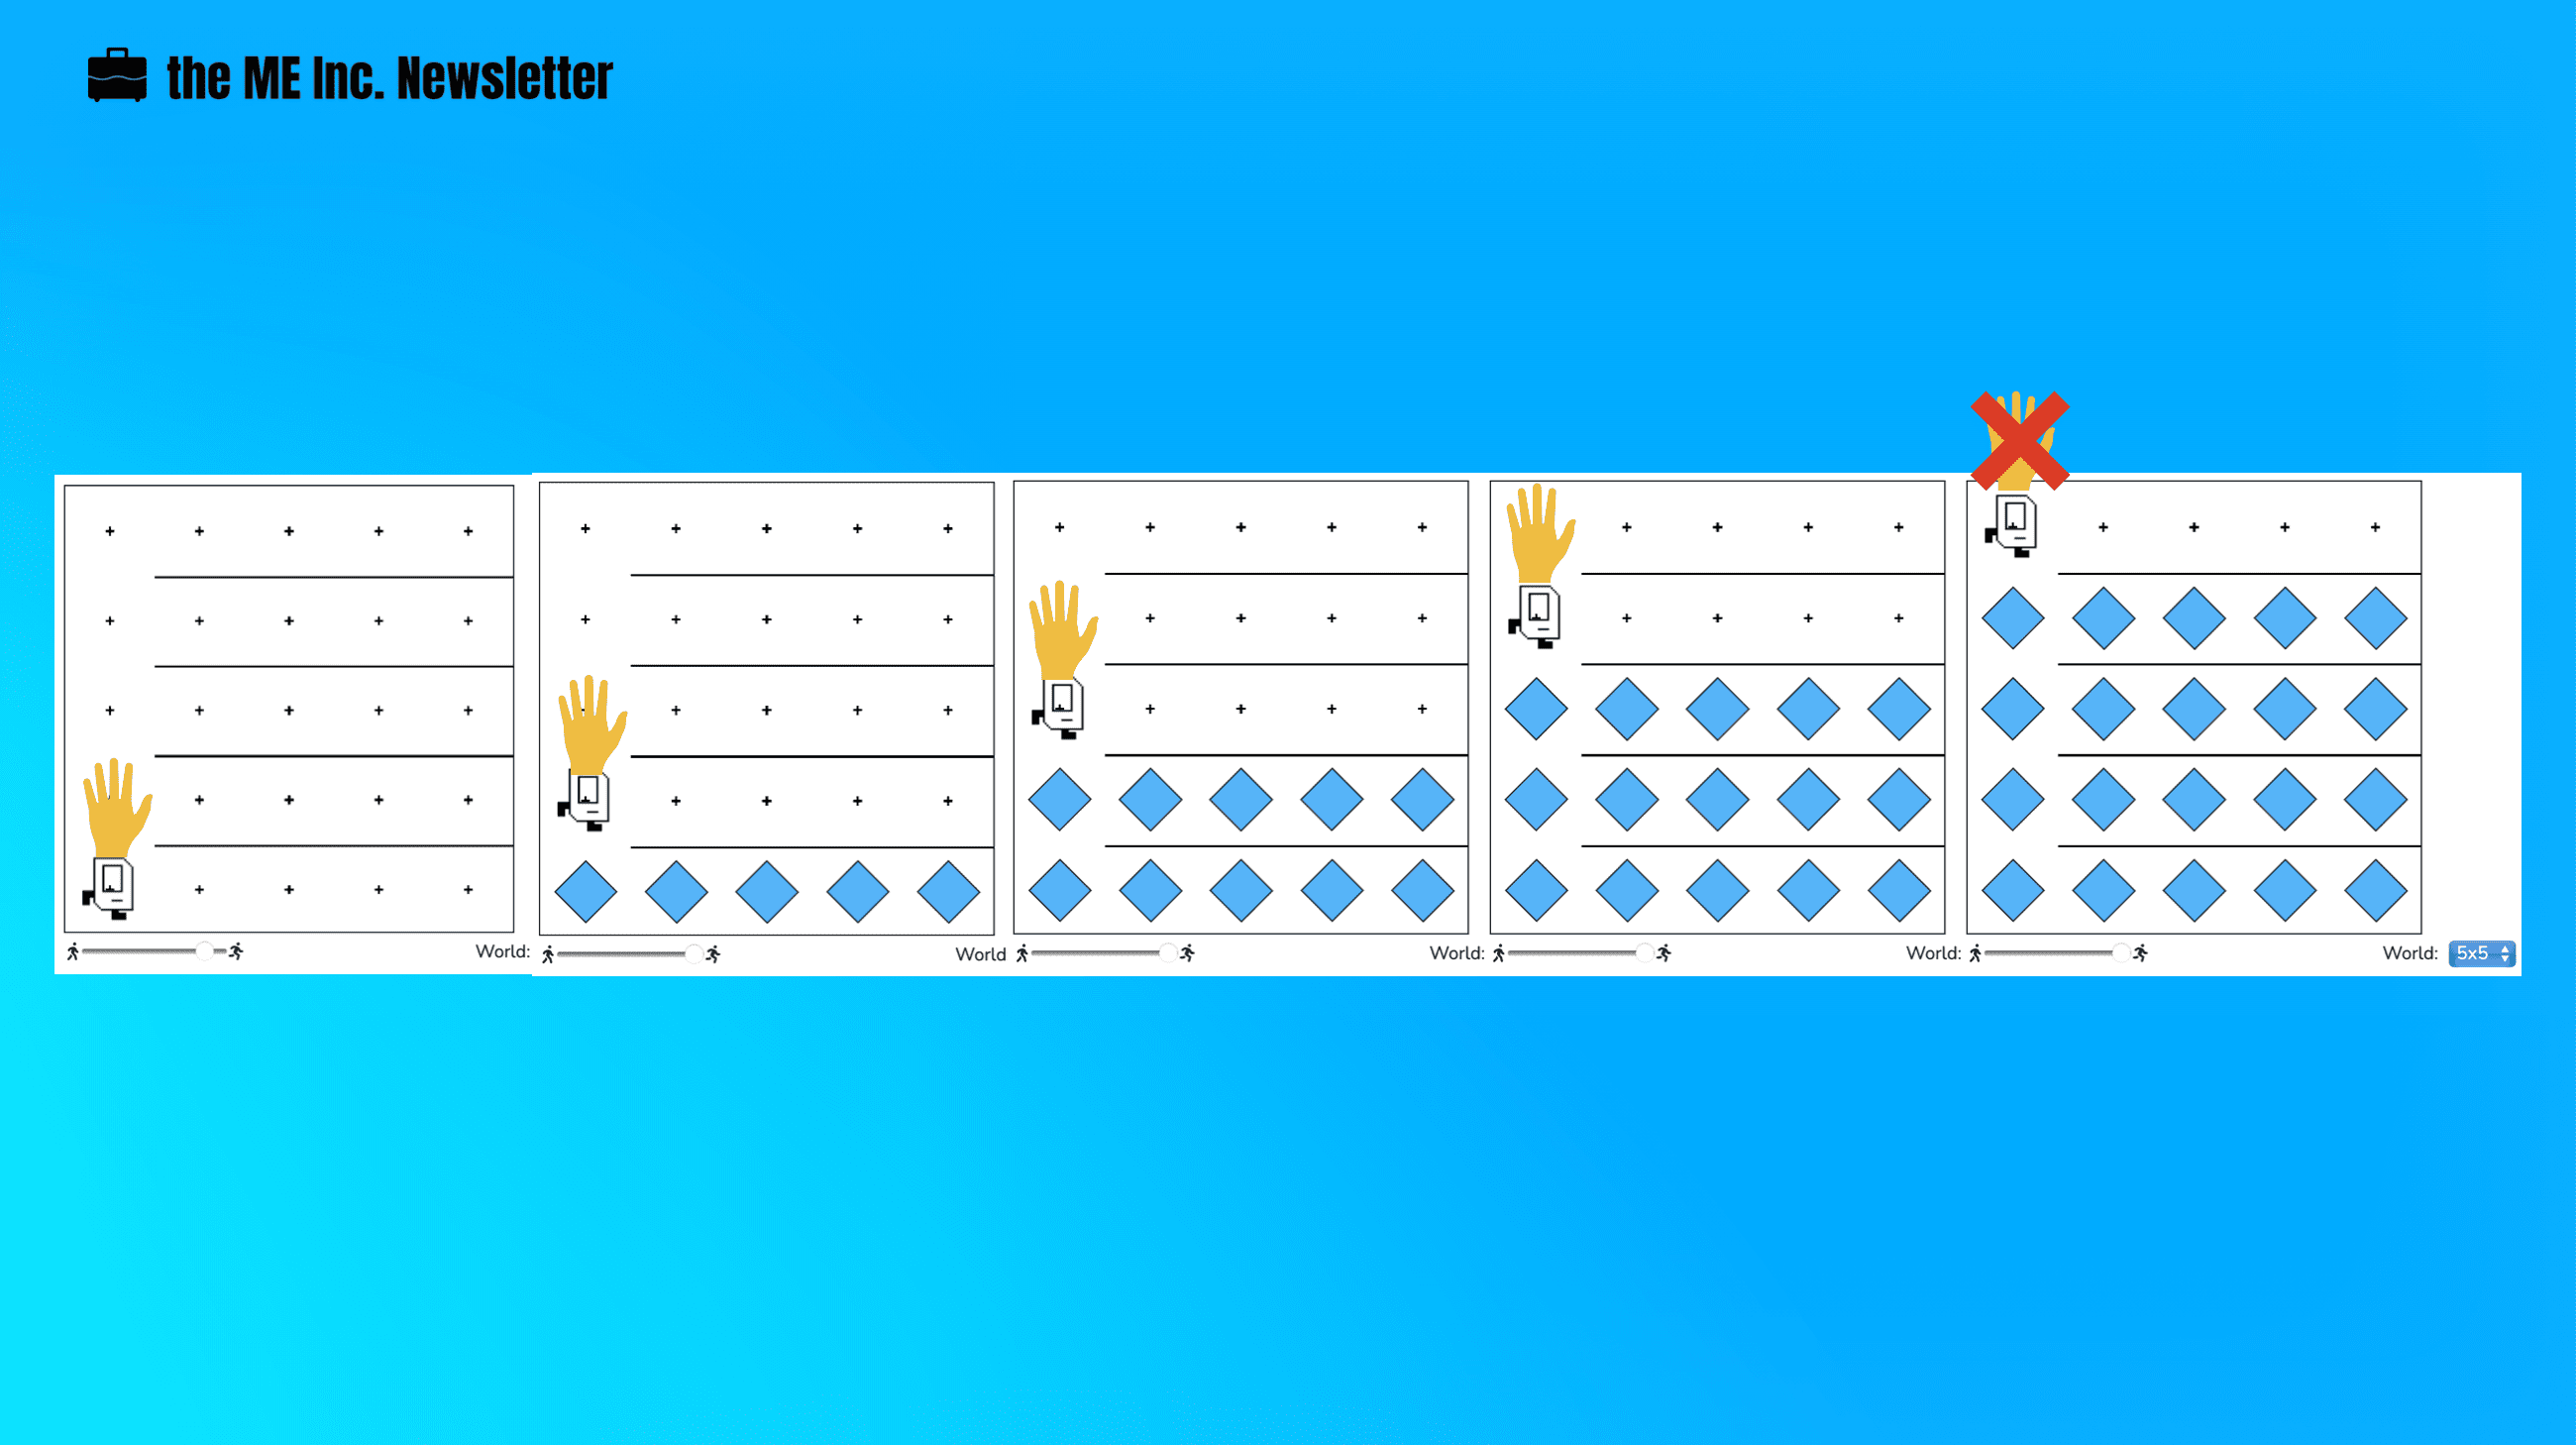
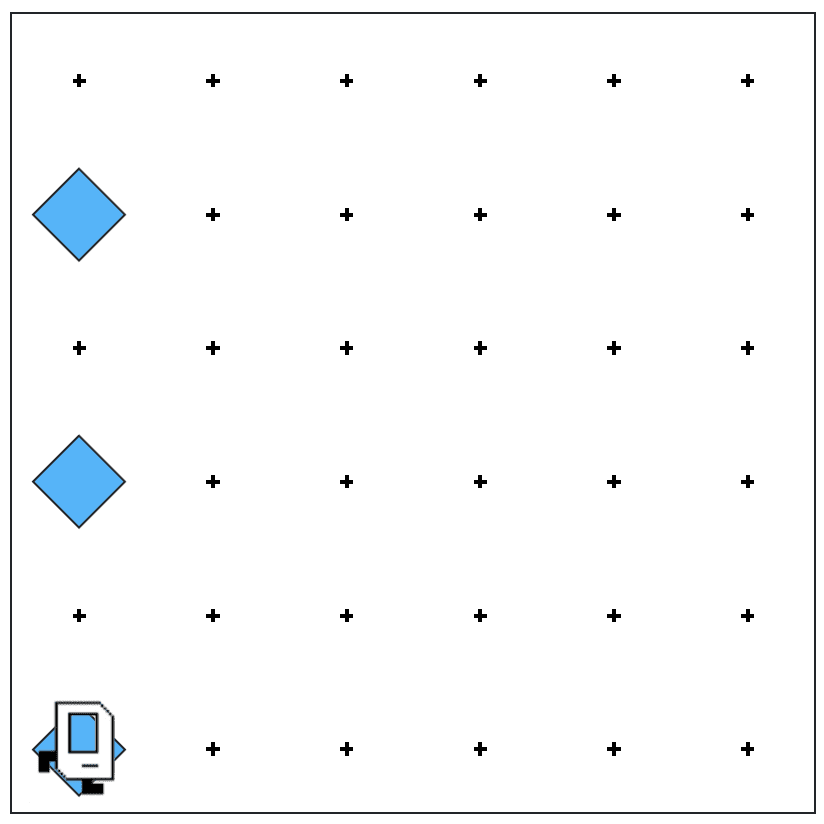
    Step 1: tag all rows in the first column

    One of the most important things to solve here is to let Karel know whether she is on an odd or even row, so that she can correctly lay down the beepers according to the pattern rules. There is no rule on where Karel can go, i.e. east, west, north, south, as long as she doesn’t bang her head against the wall. So my first step is to tag all rows in the first column, like this (we will use the 6×6 world as an example):

    In this way Karel can rely on the “if” function to know whether she is on an odd or even row, therefore know how to proceed. 

    A remainder: Karel should return to her original corner after tagging all rows.

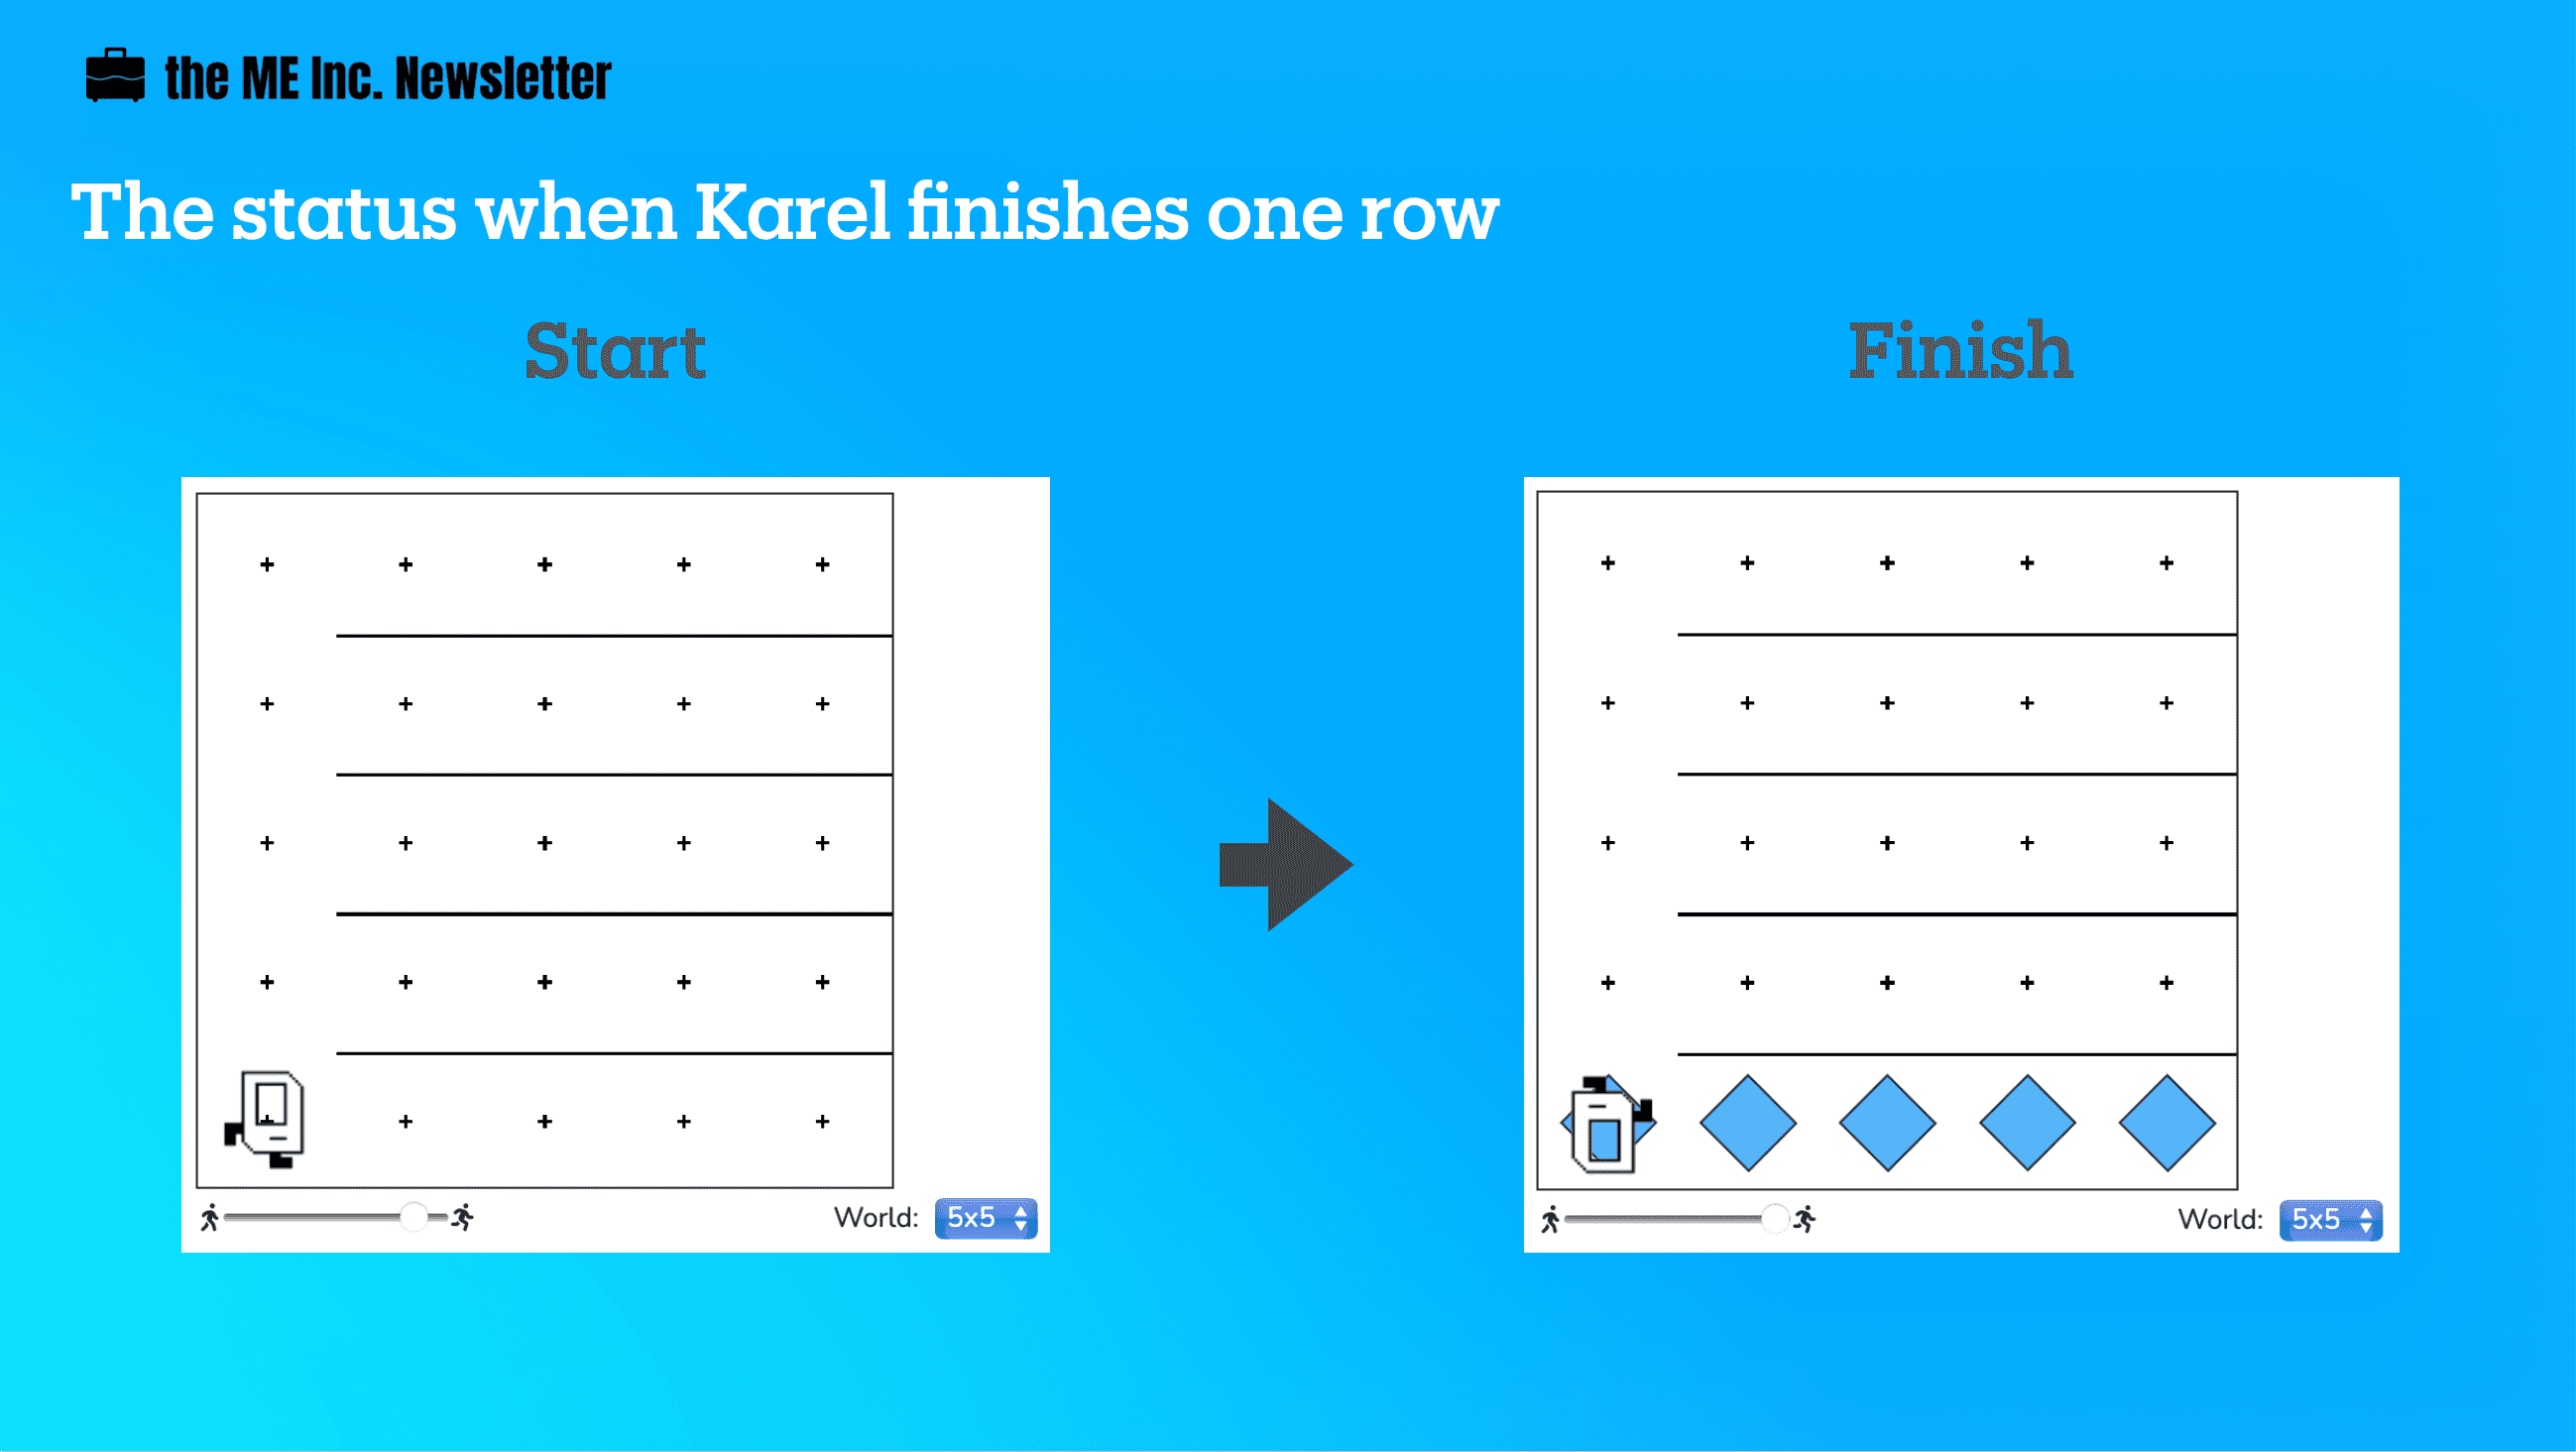
    Step 2: tag one row correctly, regardless of odd or even

    This is the core of the solution for Checkerboard Karel. 

    Since we’ve already tagged all rows, an “if/else” function would do the trick:

    If Karel is on an odd row, she simply follows a “move – move – put_beeper” pattern until she stops in front of a wall. If she is on an even row, she follows a “move – put_beeper – move” pattern. Simple as that. 

    Yet since we don’t know how big or small the world is, Karel needs to check whether her front_is_clear every time she tries to make a move:

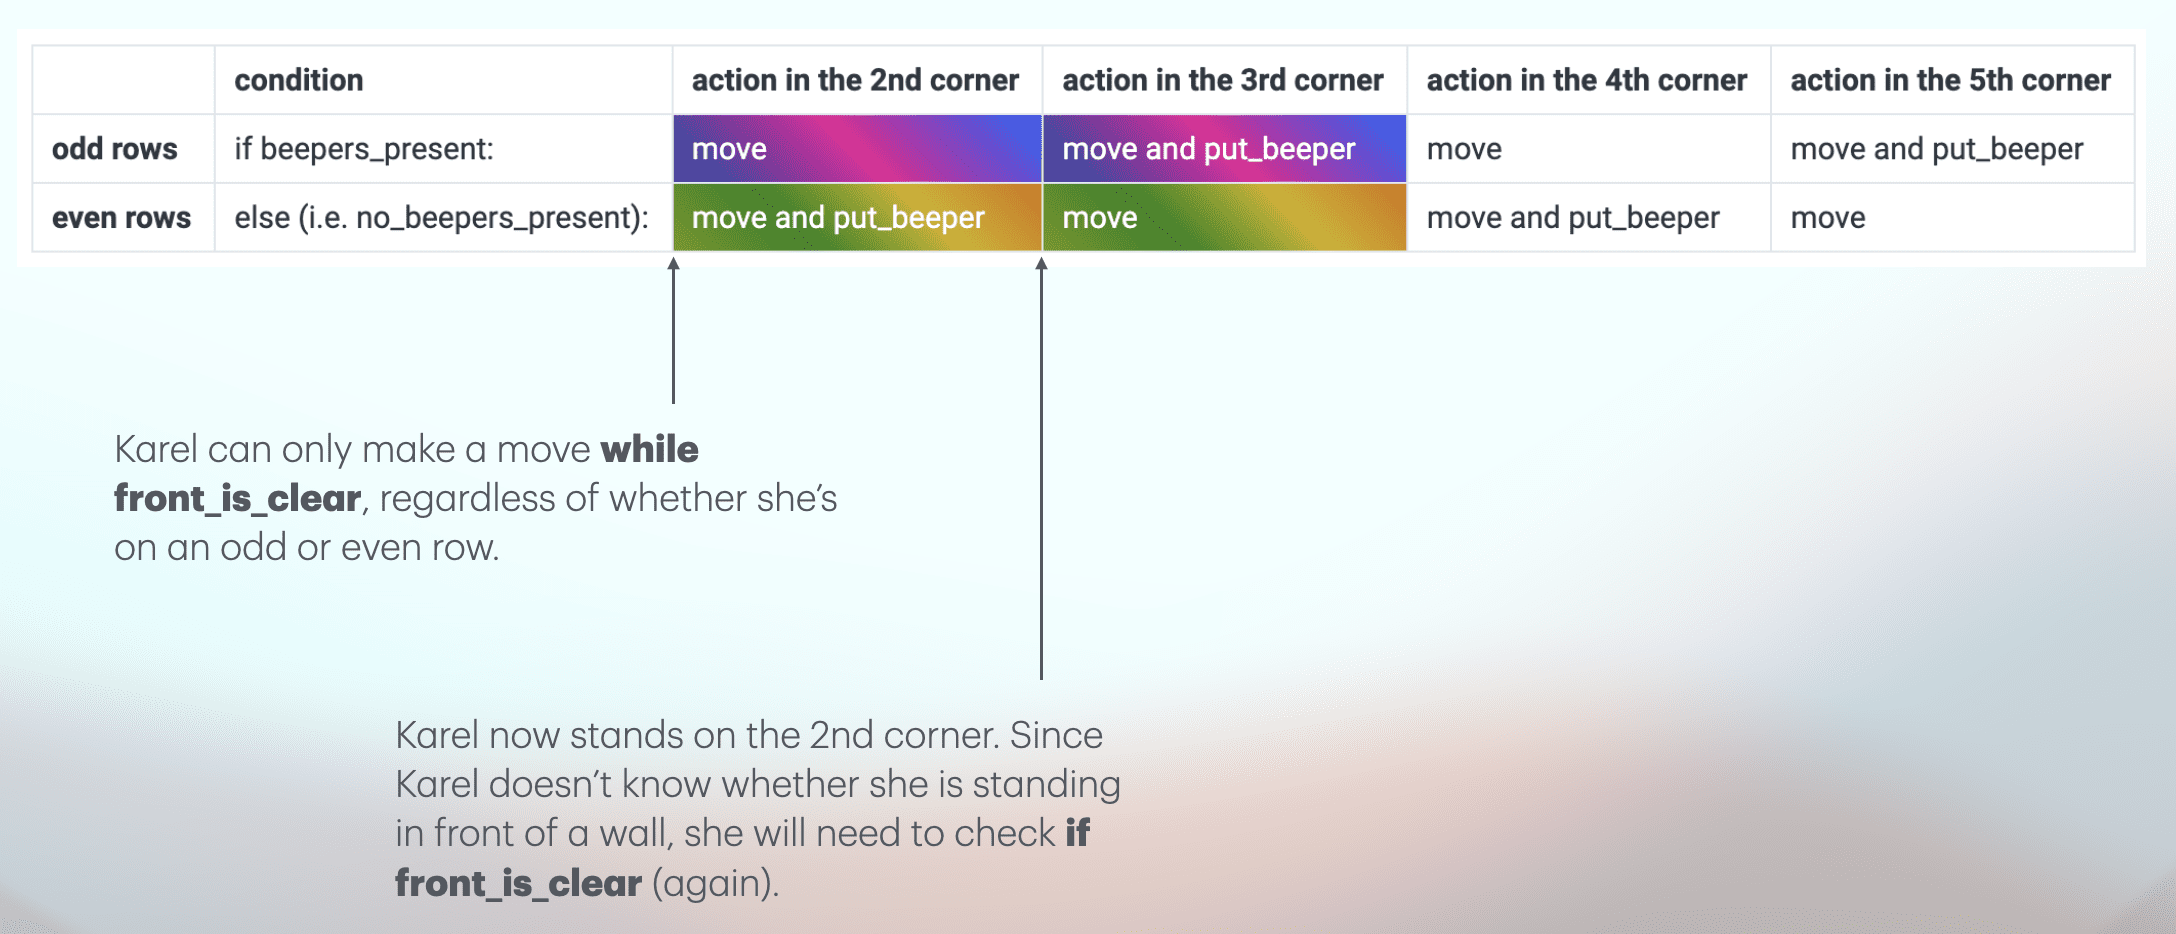
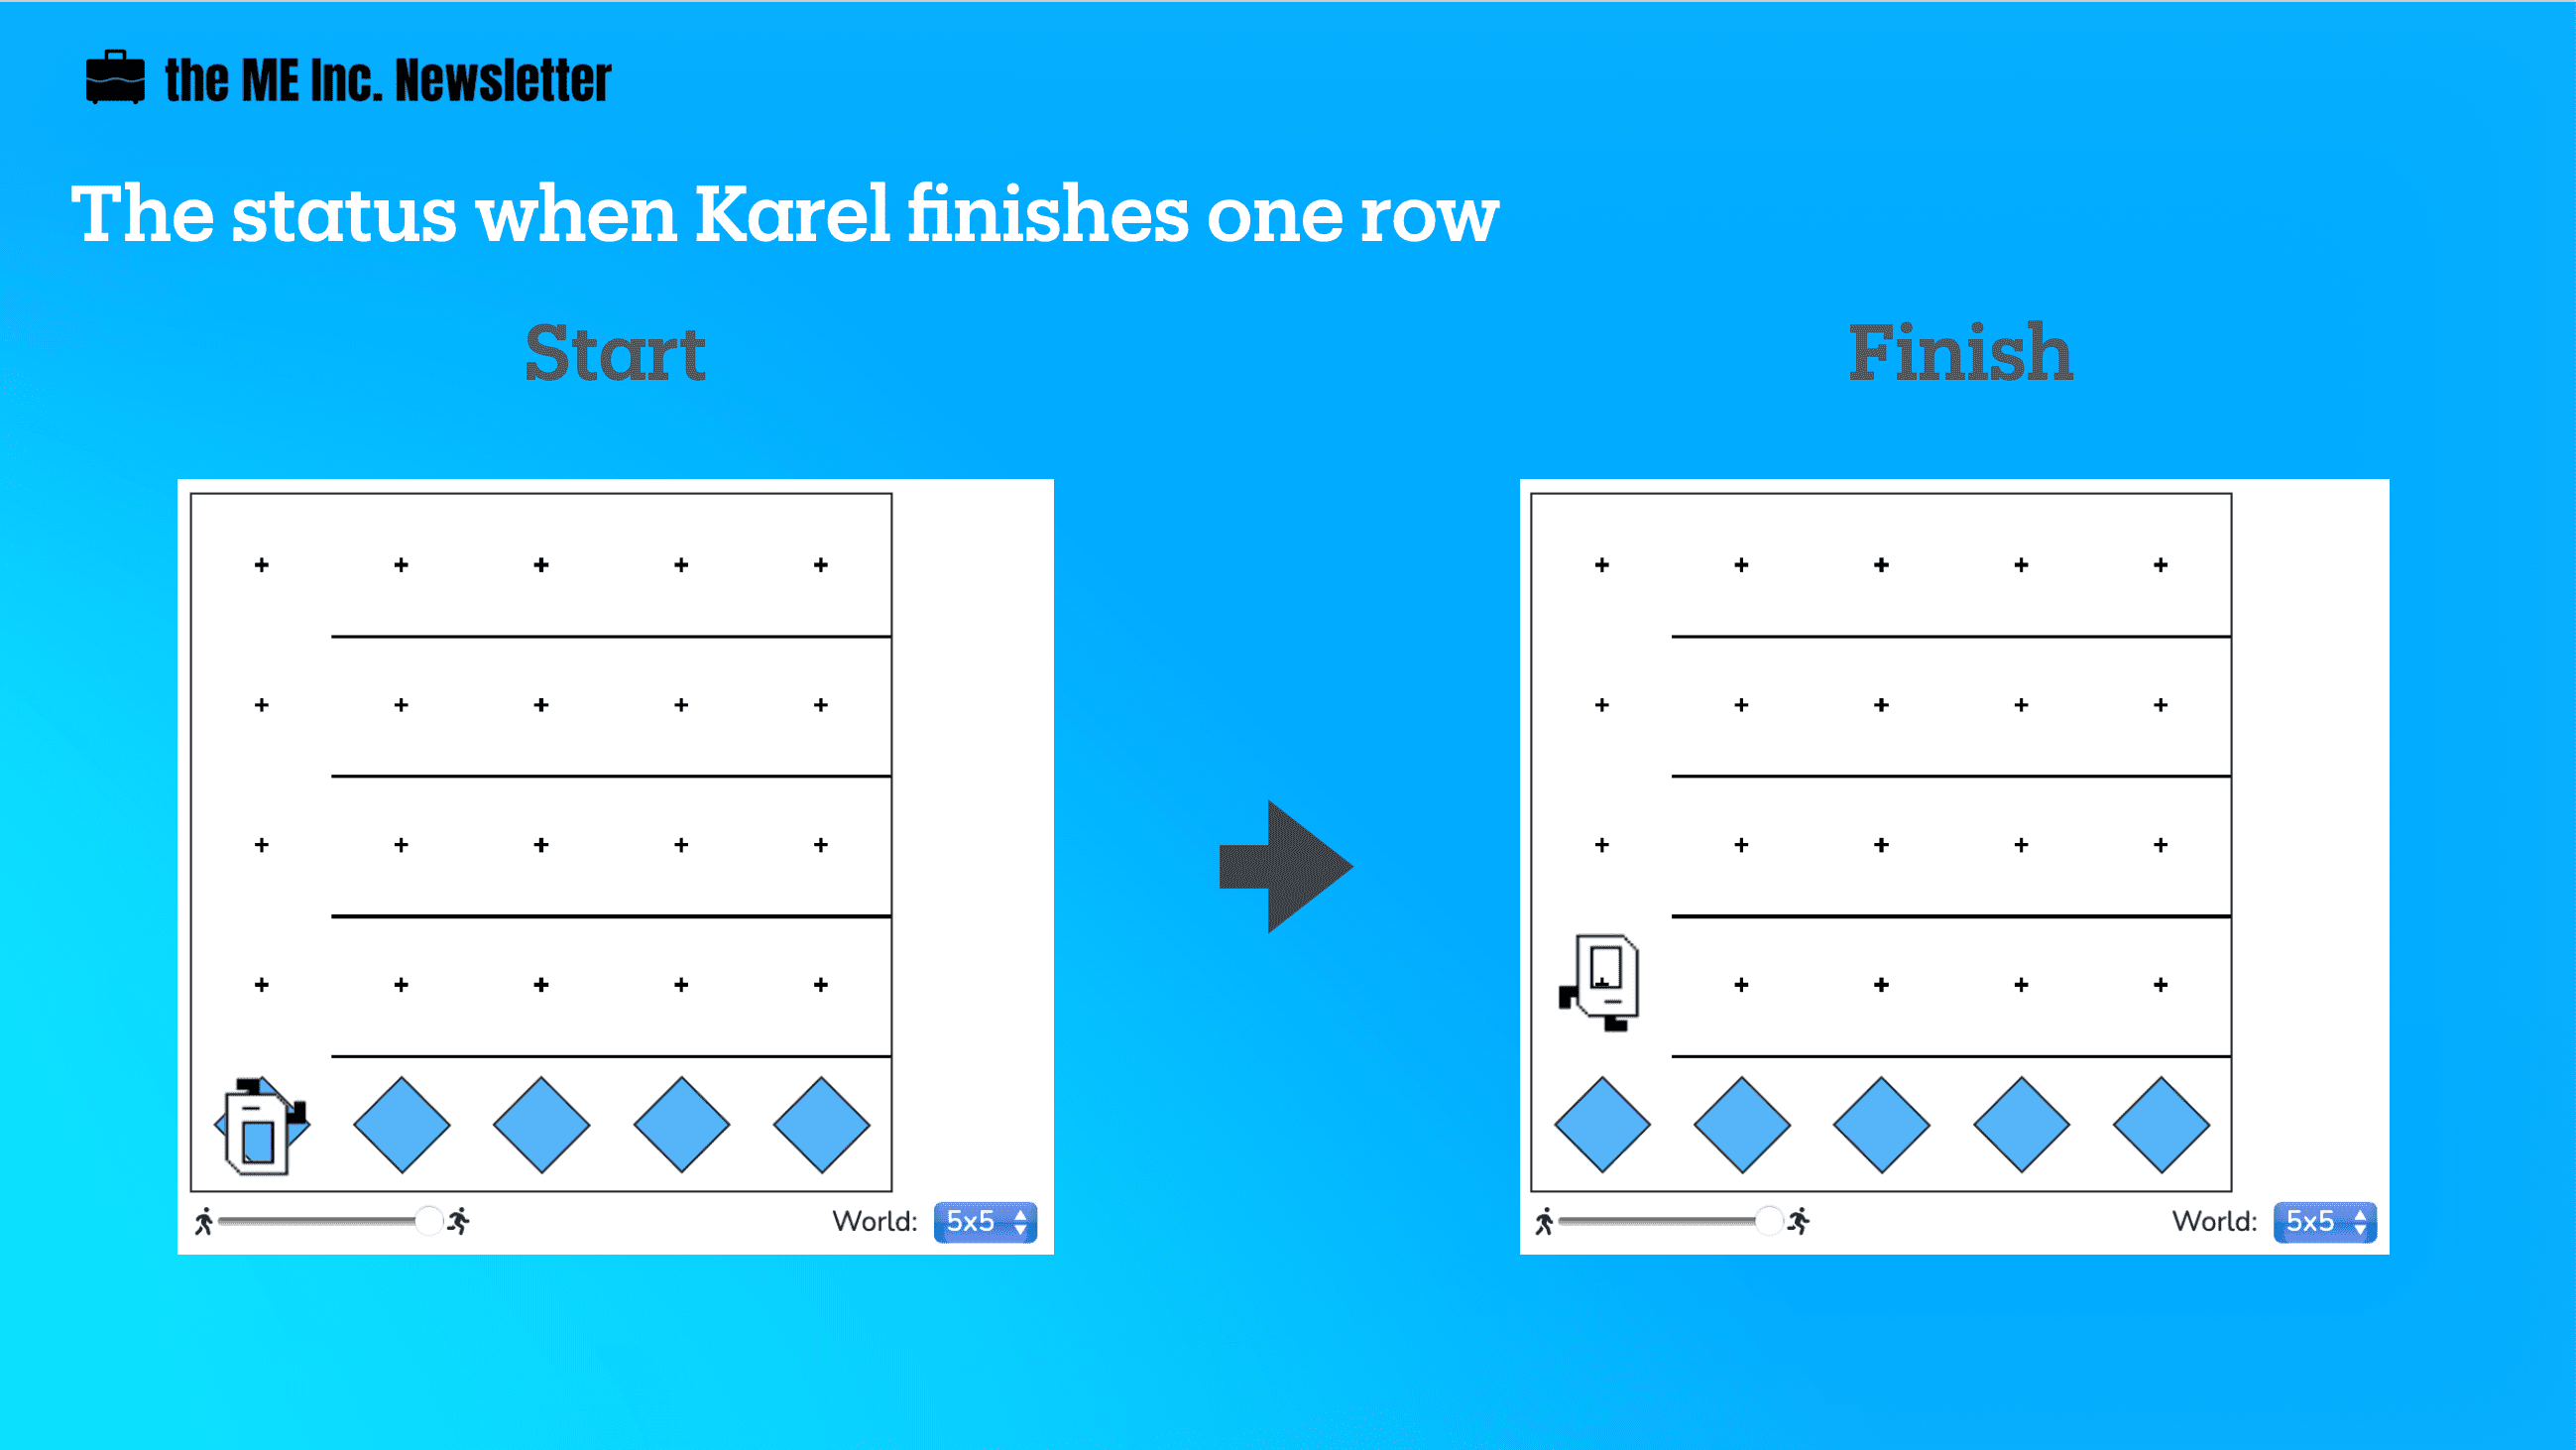
    We should also remember to get Karel return to the first corner once she finishes tagging a single row. In this way, Karel will be in the same condition every time, i.e. standing on the first corner, facing east.

    Step 3: Karel should tag every row in her world, and return to the original corner afterwards

    Because we make Karel return to the first corner on each row after tagging that row, the next step is quite easy:

    1. Turn left
    2. Move one step
    3. Turn right

    Then Karel will be on the next row, standing on the first corner, facing east, ready for action. 

    Except on the last row. 

    After tagging the last row, Karel must return to the original corner by turning right, moving to the wall, and turning left.

    The problem is to find a condition that applies to all rows except the last one, a difference that can help Karel understand when to stop and move to the original corner.

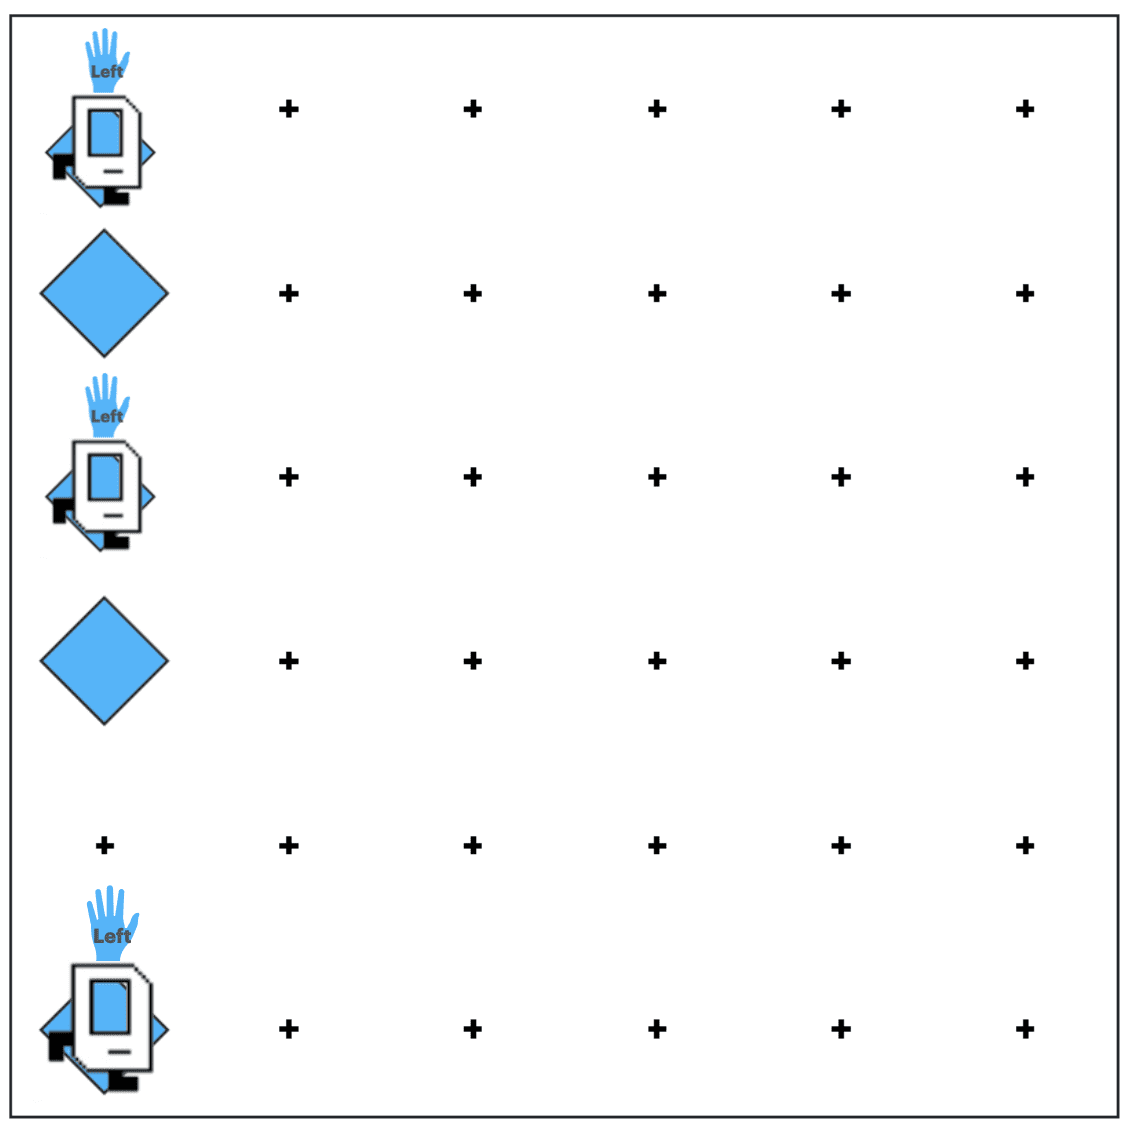
    In this world, the power lies with Karel’s left hand.

    Imagine Karel can reach out with his left hand and touch if there is a wall. For all rows except the last, Karel’s left_is_clear.

    This is the condition we need.

    The code

    This is my version of the solution, and I’m pretty sure there are other and better ways to solve.

    from karel.stanfordkarel import *
    
    """
    Karel should fill the whole world with beepers.
    """
    
    def main():
        """
        You should write your code to make Karel do its task in
        this function. Make sure to delete the 'pass' line before
        starting to write your own code. You should also delete this
        comment and replace it with a better, more descriptive one.
        """
        tag_all_rows() # this refers to Step 1
        tag_row() # this refers to Step 2
        while left_is_clear(): #the rest of this section refers to Step 3
            turn_left()
            move()
            turn_right()
            tag_row()
        turn_right()
        move_to_wall()
        turn_left()
    
    def tag_all_rows():
        turn_left()
        put_beeper()
        while front_is_clear():
            move()
            if front_is_clear():
                move()
                put_beeper()
        turn_around()
        move_to_wall()
        turn_left()
    
    def tag_row():
        if beepers_present():
            while front_is_clear():
                move()
                if front_is_clear():
                    move()
                    put_beeper()
        else:
            while front_is_clear():
                move()
                put_beeper()
                if front_is_clear():
                    move()
        turn_around()
        move_to_wall()
        turn_around()
    
    def turn_around():
        turn_left()
        turn_left()
    
    def turn_right():
        for i in range(3):
            turn_left()
    
    def move_to_wall():
        while front_is_clear():
            move()
    
    # There is no need to edit code beyond this point
    if __name__ == '__main__':
        main()

    Ta-Da!

  • Baby Vocab Solution – Stanford Code in Place

    Baby Vocab Solution – Stanford Code in Place

    The Baby Vocab Problem is essentially asking this:

    We have a list of words, among which some are repetitive. We want to find out the unique words from the list and count the number of each unique word. After that, we will print out the histograms for the words to visualize which words are spoken the most!

    The Code in Place staff has generously provided us with two really useful functions. One is to help us load all the words into a list, and the other is to help us print out histogram bars from two inputs, which are 1) the word, and 2) the word count.

    This problem has provided us with an almost perfect situation to use dictionaries as solution. If we can construct a dictionary where each pair of key and value is a combination of unique words and their respective word counts, we can use the print_histogram_bar(word, count) function to return histograms. 

    First, let’s create an empty dictionary.

        vocab = {}

    Next, let’s go over the whole list of words. For the first time we encounter a word, we will first set the count (or value) of the word (or key) to 1. If the word is already in the vocab (dictionary), we then add 1 to the count. An “if” loop might come in handy here:

     for i in range(len(words)):
            if words[i] not in vocab: # if the word is not in the vocab
                vocab[words[i]] = 1 # set the count for the word to 1
            else:
                vocab[words[i]] += 1 # if the word is already in the vocab, add 1 to the count for this word

    After that we’ve successfully created a dictionary called vocab containing pairs of unique words and their respective word counts. To test it out, I decided to print out the dictionary to see if it works by adding a print(vocab) line here. The result didn’t disappoint:

    {‘mama’: 30, ‘dada’: 26, ‘baba’: 15, ‘bye-bye’: 20, ‘hi’: 29, ‘no’: 15, ‘juice’: 10, ‘please’: 7, ‘apple’: 5}

    Last but not least, the only thing left is to print out the histograms! 

    for word,count in vocab.items():
            print_histogram_bar(word, count)

    Because the print_histogram_bar(word, count) function requires both the word and the word count, I chose to use vocab.items here as it helps skip the definition of word or count.

    This is the full code, including the pre-programed:

    def main():
        words = load_words_from_file("words.txt")
        vocab = {}
        for i in range(len(words)):
            if words[i] not in vocab: # if the word is not in the vocab
                vocab[words[i]] = 1 # set the count for the word to 1
            else:
                vocab[words[i]] += 1 # if the word is already in the vocab, add 1 to the count for this word
        # print(vocab)
        for word,count in vocab.items():
            print_histogram_bar(word, count)
        
    
    def print_histogram_bar(word, count):
        """
        Prints one bar in the histogram.
        
        Uses formatted strings to do so. The 
            {word : <8}
        adds white space after a string to make
        the string take up 8 total characters of space.
        This makes all of our words on the left of the 
        histogram line up nicely. On the other end,
            {'x' * count}
        takes the 'x' string and duplicates it by 'count'
        number of times. So 'x' * 5 would be 'xxxxx'.
        
        Calling print_histogram_bar("mom", 7) would print:
            mom     : xxxxxxx
        """
        print(f"{word : <8}: {'x' * count}")
    
    def load_words_from_file(filepath):
        """
        Loads words from a file into a list and returns it.
        We assume the file to have one word per line.
        Returns a list of strings. You should not modify this
        function.
        """
        words = []
        with open(filepath, 'r') as file_reader:
            for line in file_reader.readlines():
                cleaned_line = line.strip()
                if cleaned_line != '':
                    words.append(cleaned_line)
        
        return words
    
    
    if __name__ == '__main__':
        main()

    There you have it!

  • Fill Karel Solution

    Fill Karel Solution

    Karel needs to fill the entire world with beepers regardless of the size of the world. Other than the first column, the rest of the world are segmented by horizontal walls, preventing Karel from getting to the next row above. Our goal is to write code that does the job no matter how large (or small) the world is.

    The problem looks pretty daunting at first. How can Karel know when to put beepers or when to move? 

    Well the solution lies in decomposition. 

    The Thinking Through

    If your dad asks you to lay down the tiles in your porch, how would you do that? 

    You probably would lay one row of tiles at a time. 

    Then you get to the next row and lay down tiles there. So on and so forth.

    Until you get to the last row, lay down the tiles, and stop.

    That is exactly what we are going to do here:

    1. finish one row
    2. move to the next row

    1. Finish One Row

    Karel will have only finished a row when she:

    1. puts beepers on every spot in that row
    2. turns around, and
    3. moves all the way back to the wall

    At this point, Karel will be facing west, ready to move to the next row.

    2. Move to the Next Row

    Once Karel finishes a row, she will be ready to move up to the next row. The steps that Karel needs to follow are pretty simple:

    1. turn right
    2. move
    3. turn right

    At this point, Karel will be, again, facing an empty row, ready to lay down the beepers for that row, so it’s just a matter of repeating the same process.

    But when should Karel stop?

    3. The Condition to Stop

    For every row other the last one, Karel will return to the first spot after laying down all the beepers, which means Karel “knows” when she is in the last row.

    How is it possible that Karel knows this?

    Well, we need to find some quality that only the last row has, differentiating it from the rest of rows. 

    Every time Karel starts from the first spot, ready to put down beepers for a certain row, her left is clear other than when she is in the last row. It will be easier if you try visualize like Karel is reaching out with her left hand, and only when she is in the last row that her left is NOT clear.

    Writing the Code

    1. Finish One Row

    Recall that to finish one row, Karel will need to do three things:

    1. puts beepers on every spot in that row
    2. turns around, and
    3. moves all the way back to the wall
    def finish_one_row():
        laying_tiles()
        turn_around()
        move_to_wall()

    We will keep breaking down each of these three functions:

    def laying_tiles():
        put_beeper()
        while front_is_clear():
            move()
            put_beeper()
    
    def turn_around():
        turn_left()
        turn_left()
    
    def move_to_wall():
        while front_is_clear():
            move()

    2. Move to the Next Row

    def move_to_next_row():
        turn_right()
        move()
        turn_right()
    
    def turn_right():
        for i in range(3):
            turn_left()

    By this point, we are ready to write the whole thing. Remember that while Karel’s left is clear, she should keep finishing one row at a time and move to the next row, and when it’s not clear, she should simply lay down the tiles and call it a day.

    def main():
        while left_is_clear():
            finish_one_row()
            move_to_next_row()
        laying_tiles()
        
    def finish_one_row():
        laying_tiles()
        turn_around()
        move_to_wall()
    
    def turn_around():
        turn_left()
        turn_left()
    
    def move_to_wall():
        while front_is_clear():
            move()
    
    def laying_tiles():
        put_beeper()
        while front_is_clear():
            move()
            put_beeper()
        
    def move_to_next_row():
        turn_right()
        move()
        turn_right()
    
    def turn_right():
        for i in range(3):
            turn_left()
    
    # There is no need to edit code beyond this point
    if __name__ == '__main__':
        main()

    The main function is simple, easy-to-read, and elegant. This is the beauty of decomposition. And by finding the unique quality of the stop condition, we manage to construct a universal solution with the while loop.

  • Spread Beepers Solution

    Spread Beepers Solution

    Spread beepers is an interesting problem. While it’s easy for a human eye to solve the problem, it actually takes a bit of decomposing skills for Karel to finish the job.

    Karel has the ability to find out whether there are beepers present, but she cannot know how many left. In other words, Karel doesn’t count

    The Thinking

    Since the pile of beepers is always on the second corner, Karel should move just once to the beepers location. After that, Karel can start doing her work. Since Karel already possesses infinite numbers of beepers in her bag, and Karel doesn’t know how to count, she cannot pick up all the beepers at once. Instead, Karel should pick up a beeper, go to the next empty location, put down the beeper, and return to the starting corner, facing east. 

    One of the most difficult issue with this problem is that since Karel doesn’t know how to count, she will keep picking up beeper even when there is only one left. Our solution to this issue is to put the beeper back if Karel incorrectly picks up the last beeper from the second corner. To accomplish this, we will have to put in an additional layer of condition.

    def spread():
        while beepers_present():
            pick_beeper() # karel can only pick 
            if beepers_present():
                move_to_next()
                put_beeper()
                move_to_start()
                move()
        put_beeper()
    
    def turn_back():
        turn_left()
        turn_left()
    
    def move_to_start():
        turn_back()
        while front_is_clear():
            move()
        turn_back()
        
    def move_to_next():
        while beepers_present():
            move()

    The while loop and the if loop together helps Karel understand when she needs to stop picking up beepers. If you understand this, the solution become natural.

    The Coding

    from karel.stanfordkarel import *
    
    # let it go to starting point at the end
    
    ## helper function
    
    ## 1 turn back 
    
    def turn_back():
        turn_left()
        turn_left()
    
    ## 2 move to the start
    def move_to_start():
        turn_back()
        while front_is_clear():
            move()
        turn_back()
        
    ## 3 move to next
    def move_to_next():
        while beepers_present():
            move()
    
    ## 4 work function find and spread beeper
    def spread():
        while beepers_present():
            pick_beeper() # karel can only pick 
            if beepers_present():
                move_to_next()
                put_beeper()
                move_to_start()
                move()
        put_beeper()
    
    ## Main 
    def main():
        move()
        spread()
        move_to_start()
    
    # There is no need to edit code beyond this point
    if __name__ == '__main__':
        main()
  • Ghost email configuration: how to send newsletters from your own email address with Ghost (Pro)

    Ever wonder how your favorite email newsletter sends you emails from a personal email addresses such as pat@starterstory.com instead of something like noreply@starterstory.com? With Ghost you can manage your email configuration easily. However, there could be some complications.


    “noreply”: The default email configuration in Ghost

    If you belong to the not-so-technical camp but still desire to write online, Ghost’s hosting service could save you some trouble. When you set things up right, you will be able to write a post and publish it on the site and send it as an email newsletter to your subscribers at the same time.

    This is my first newsletter sent to myself with Ghost. The email was sent from noreply@michaelshoe.com via m.ghost.io. The only thing I did before this was linking my own domain with Ghost, and magically, I am capable of sending out email newsletters in bulk to my subscribers (though I still don’t know the mechanism behind)!


    I want to get “personal” with my dear followers.

    To be specific, my goal is to accomplish these two things: 

    1. Enable readers to reply to the sending domain (i.e. replying to noreply@michaelshoe.com) and have a direct one-on-one email communication with me (i.e. hit reply, write an email to me directly)
    2. Use a custom email sending domain to send out newsletters, i.e. replace noreply@michaelshoe.com with something like hi@michaelshoe.com

    The process, as it turned out, was easier said than done. 

    Enabling readers to reply to the sending domain

    Accomplishing #1 is my priority, since it is important to talk to my dear subscribers directly in my initial phase, an embodiment of “doing the things that don’t scale” mantra. I tried to reply to noreply@michaelshoe.com, and then checked my personal email – the one I used to sign up to Ghost – the email was nowhere to be found.

    I then went to my domain registrar, Porkbun, to look for some clue. Porkbun actually provides free email forwarding up to 20 for free if you purchased a domain with them, and I swiftly set it up to have emails sent to noreply@michaelshoe.com delivered to my personal email. However, even though I can receive emails sent to noreply@michaelshoe.com, I can only reply via my personal email address. Additionally, I disliked “noreply” as it presents a robotic feeling, and it literally tells people NOT TO REPLY. So I kept on looking for a better solution.

    Just type in “noreply” in the first box and type in your own email address in the second

    Use a custom email sending domain to send out email newsletters

    To accomplish #2, I first activated an email account with my domain registrar, Porkbun, by leveraging their free three-month email domain service. Now I have my own custom email domain, hi@michaelshoe.com, with their email host. I also configured DMARC, an additional security measure that uses SPF and DKIM to help prevent email spoofing, even though I have absolutely no idea what it means (more on this later). After I’ve acquired my own email domain, I also set it up so that I can send and receive emails from hi@michaelshoe.com in my Gmail mailbox. If you are also using Porkbun, you can read “How to Set Up an Email Address in Gmail” here.

    If you are using Ghost (Pro) to send email newsletters, there are two places where you need to make further configurations if you want to use your custom email sending domain. The first place is your membership portal, and the second place is your newsletter.

    Membership portal

    Your membership portal (Membership -> Portal settings) is the place to: 

    1. Customize the look & feel of your signup button and your signup modal
    2. Change the support email address, i.e. the email address that sends the welcome email to the first-time subscriber 
    Membership -> Portal settings -> Account page

    Newsletter

    “Newsletters” is the place to:

    1. Customize the design of your newsletter, i.e. how it arrives in your subscribers’ mailbox
    2. Set up basic newsletter info, i.e. name, basic descriptions, and sender email address and reply-to email address

    Solving one problem created an even bigger one

    I changed all email addresses to my own hi@michaelshoe.com, both for the Membership Portal and for the Newsletter, and then gave it a shot. Something horrible happened afterwards: all my email newsletters and signup welcome emails went straight into spam; when I dug them out of the graveyard, they were covered with a warning sign like this:

    What made this an even bigger problem was that regardless of how I tried to tell Gmail that this wasn’t spam, Gmail was adamant about its original opinion. I clicked on the “Looks safe” button, and marked it as no spam, and tried sending again. Again the letter ended up in the spam.

    At this point, I’ve exhausted all my skills and methods, so I resorted to the Ghost support team for help. They replied within a few hours and gave me a clearcut solution – disable DMARC in my email hosting. It worked.

    As it turned out, Ghost (Pro) offers custom sending domains, but this feature is only supported on the Creator Plan or higher on Ghost (Pro). As a humble Starter Plan user, I don’t have the luxury to this feature.


    I’ve figured out how email configuration works in Ghost, but decided it’s not worth it to change.

    At this point, I was able to accomplish both goals, i.e.:

    1. Enable readers to reply to the sending domain (i.e. replying to hi@michaelshoe.com) and have a direct one-on-one email communication with me 
    2. Use a custom email sending domain to send out newsletters (hi@michaelshoe.com, instead of the default “noreply”)

    However, I’ve decided to revert back to Ghost’s default sender addresses. I’m not technical enough to figure out the problems, and it’s just not worth it to risk not delivering the newsletters into every subscriber’s mailbox. It doesn’t matter how personal-sounding your name is if all your emails are ending up in the readers’ spam. Ghost has done a great job to ensure deliverability and it’s just too risky for me to change that. Plus DMARC sounds too important to be turned off.

    I still want to have that personal connection with my subscribers, and my solution is simply to add my hi@michaelshoe.com email at the bottom of each newsletter so people can just click and start writing to me. 

    P.S. the question that finally got answered: who created the “noreply” email domain and why I can only send, but not receive, emails from it?

    This question finally got answered by the Ghost support team (kudos to them!).